Category Archives: Vegetarian Recipes

Courgettes on the Grill

I’m sitting here writing this surrounded by buckets of courgettes.

IMG_2776

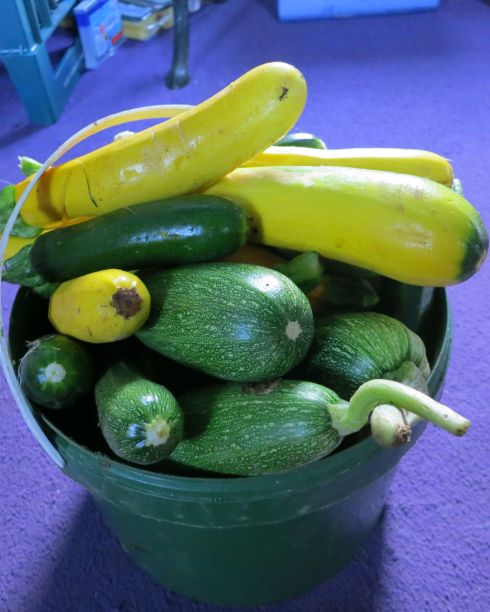
The sunshine, followed by an intense blast of rain, has sped up the growth and todays picking produced an interesting assortment of different shapes and colours.. Some are huge – it’s amazing how much a courgette grows each day if the conditions are good.

The weather definitely affects their production. The plants need a good amount of water and love sunshine. They are better cared for when we have a heat wave as I’m all up for an all over tanning opportunity. Standing in the garden spraying water is on my list of relaxing jobs. The days when it’s overcast and looks like rain are the worst because the watering doesn’t happen. Somehow my brain equates sunshine with watering, not clouds.

As the summer moves on so do the plants. They get bigger and begin to sprawl. We have eaten the first flush and are no longer hovering over the plants waiting for them to grow as there are other exciting vegetables maturing and sneaking into first place. This means that quite a few pass under the radar and get very big.

This all brings us to the annual courgette conundrum. We have been enjoying a variety of recipes – soups, salads, stews, pizzas, cakes etc.

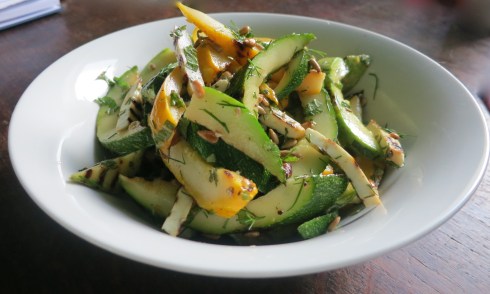
I particularly like this salad of grilled courgettes. Very simple and easy to make and size doesn’t matter. Big, small and medium courgettes are all fine.

I use a cast iron grill pan for grilling which leaves funky looking griddle marks but a barbecue or regular grill would do the job too. The important thing is the heat. It must be hot. Whichever method you use it’s important to pre heat to sizzling.

Grilled Courgettes and Halloumi

IMG_5614

4-6 medium courgettes

200g halloumi

2tb sunflower seeds

2tbs pumpkin seeds

a big handful of mint, chopped

1 lemon, washed well

approx 150mls olive oil

salt and pepper


Cut the courgettes in half lengthwise and scoop out the seeds with a spoon.. Sprinkle over a little salt and put into a bowl. Toss gently then leave for 20- 30 minutes. The salt will draw out some of the excess water. Put the courgettes onto a clean t-towel and pat dry. Wipe out the bowl and return the courgettes and toss with a little olive oil.

Heat the grill to very hot, griddle pan to very hot or have good barbie on the go.

Put the courgette halves on the pan/grill etc. Don’t overcrowd. Best to do in a couple of batches. Cook for 4-5 minutes each side. Less if it looks like it’s burning rather than a light char.

Put the cooked courgettes in a large clean bowl and leave to cool

Slice the halloumi – medium/thick slices – and rub a very little olive oil over them – too much and the cheese will burn.. Grill for a minute or two each side, until lightly golden. Put aside to cool.

Heat a dry frying pan then stir in the sunflower and pumpkin seeds, toast on a medium heat. Keep tossing the seeds so they cook evenly until lightly golden. Take off the heat, tip into a small bowl and leave to cool.

Slice the grilled courgettes on the diagonal into strips.

Slice the halloumi on the diagonal into strips

Put the courgettes and halloumi into a large bowl together with the zest of the lemon, juice of half, the chopped mint and a good glug of olive oil.

Grind a little black pepper over then toss everything together with your hands.

Taste. Add some salt if you think the flavour is a bit dull or more lemon juice if you think it needs further brightening up.

Eat warm or room temperature.


It’s pea time!

IMG_5612

Our peas are up and podding up nicely. They enjoy sun and rain, so have been steadily coming on.

We don’t grow too many real peas and truth be told half the time our peas end up in a serious muddle, the mange tout look very similar until a certain stage and often the ‘pea’ peas get harvested too early in a case of mistaken identity. We’re well aware of this problem but don’t seem to be able to get on top of it. Each year finds us humming and hawing and scrabbling around looking for the identifying markers that were carefully put in at the end of the row when the peas were planted. They mysteriously seem to relocate and confusion abounds.

Not many people grow regular peas anymore, there’s time involved and by the time enough are podded for dinner it’s easier to buy them frozen but it surely is a sweet treat. I like to eat them like sweeties, picking a few pods and munching away whilst gardening. They bring back childhood memories of sitting on the doorstep with my mum in the sunshine when I would help with the shelling and no doubt eat as many as landed in the colander.

It’s worth noting that peas began to deteriorate as soon as they’re picked, the sugar rapidly converts to starch, which is why frozen peas are so successful. If you can get you hands on recently picked peas they are delicious, but if they’ve travelled far it’s maybe not worth the effort.

There must be some massive pea farms out there somewhere, filling freezers worldwide with packets of neat green peas. I checked out the processing and came up with these interesting facts;

Peas are harvested, transported from the fields and frozen within 150  minutes, that’s only two and a half hours – 30 minutes picking by a machine called a ”viner’ which sucks up the peas from the field and removes the pods, 30 minutes travelling to the factory then 90 minutes to wash grade and freeze. It takes only 6 minutes to freeze a pea!

This all makes them the ultimate convenience vegetable, ready to use and very easy to prepare.

Here’s a recipe for a light and fresh pea soup, equally simple to make with fresh peas or frozen peas.  It can be eaten hot or, if the heat-wave comes, chilled. I like it with a little creme fraiche but that’s optional.

IMG_5516

Pea and Mint Soup


1 onion

1 medium potato

25g butter or olive oil

750mls vegetable stock

450g peas – fresh or frozen

a bunch of mint, roughly chopped


Peel and chop the onion. Heat a saucepan, melt the butter or add the olive oil then stir in the chopped onion. Cook on a gentle heat.

Peel the potato and dice small, stir in with the onion and add a little salt and pepper to season. Cook gently for ten minutes without browning. This slow cooking is important as it adds depth of flavour,

Add the vegetable stock and bring to the boil. Cook for a couple of minutes, until the potato is tender then add the peas. Bring back to the boil then simmer for 5 minutes. Take off the heat, add the chopped mint and puree using whichever gadget you own – stick blender, liquidiser or food processor, until smooth. Adjust the consistency by adding some water if the soup is too thick and check the seasoning.

Serve either hot or chilled, with a little dollop of crème fraiche if you fancy.

Easy Peasy!


Rhubarb, Rhubarb

IMG_5460

The garden has speeded up big time in the past few weeks. The rise in temperature and some sunshine had all the little seedlings that were at the ‘Will I or Won’t I” live or die stage zoom into action and grow like mad. Suddenly the glass house wasn’t big enough to hold everything. There has been a frenzied potting up and transplanting out session and it’s looking good. Everything is thriving with the sunshine and rain treatment.

Taking into consideration that everything is a few weeks behind with the cold start there’s still a bit of a gap on the eating front. We have spinach and chard again in the tunnels and lots of young herbs in the garden but apart from that and the thriving clump of rhubarb it’s all potential. Potential beans, peas, spuds, fennel, kales etc., all settling in to their newly made beds outside.

The rhubarb is looking great as usual. It’s obviously happy and grows prolifically. The trouble is that apart from the initial excitement at a rhubarb tart or crumble it’s uses are quite limited. I do make a rhubarb and ginger jam which is delicious but with so much else to do jam making isn’t the top of the list.

I decided to play around and put the rhubarb in a salad. I googled for recipes but most called for roasted rhubarb, which might be delicious but not the texture I was looking for in a salad so I decided to try a light pickling and the result was very good, lovely sweet, sour and crispy and excellent together with beetroots, quinoa and orange.

Here’s the recipe, and I will be carting bunches of our rhubarb to the shop so if you fancy trying it without cooking pop in and pick some up

Beetroot , Rhubarb and Quinoa Salad


2-3 beetroots

1 red onion

2 stems rhubarb

1 orange

150g quinoa

2 tbs white balsamic vinegar

1dsp caster sugar

a bunch of mint – chopped

100mls olive oil

100g fresh goats cheese or feta – optional


Cook the beetroots. Give them a wash and tidy up the top where the greenery was then either rub them with olive oil and put in an oven tray and cover with silver foil and bake them for I hour to one hour and a half (180c) or put them in a saucepan and cover with water and simmer covered with a lid for 25=40 minutes. The cooking time will depend on the size of the beetroot. Test whether the beetroots are cooked by piercing with a small sharp knife. If it goes in with no resistance, the beetroot is cooked.

Measure the quinoa and water into a small saucepan. Add a little salt and bring to the boil then reduce the heat to simmer. Cover with a tight fitting lid and cook for 12-15 minutes, until all the water has been absorbed. Tip the quinoa into a large bowl and leave to cool.

Peel the red onion and slice finely. Sprinkle over a little salt and rub into the onion. The rings will fall apart.

Wash the rhubarb then slice , on the diagonal into skinny pieces.

Put the vinegar, sugar and a good pinch of salt into a bowl and mix until dissolved. Stir in the onion and rhubarb and put aside for at least 15 minutes.

IMG_5440

Peel the cooked beetroots and dice into equal sized cubes.

Peel the orange with a sharp knife to remove all the skin and pith then remove each segment of orange with a sharp knife by cutting each side of the segment, leaving the skin behind. Do this over the onion and rhubarb to reserve any juice.

Fluff the quinoa up with a fork, then add the beetroot, chopped mint and orange pieces. Lift the onion and rhubarb out of the bowl leaving the vinegar mix behind and add to the quinoa. Whisk the olive oil into the vinegar then pour over the salad. Quickly toss everything together , check the seasoning – it may need a little more salt.

IMG_5442

Serve with fresh goats cheese or feta crumbled on top or without if you want to keep it vegan and dairy free.


Funky Vegetable Wraps

IMG_5427

These wraps are completely different. They’re made from only vegetables, ground almonds and pysllium husks. No gluten, no dairy, no eggs  and they are alkaline. Perfect for anyone on a restrictive diet that fancies a sandwich or wrap.

It is a recipe that I have been playing around with, inspired by a recipe from Green Kitchen Stories.

So far it seems that anything that I have in the vegetable basket, whizzed up with almonds and pysllium make perfect wraps. I have used beetroot, carrots, courgette and carrot, broccoli and carrot and for sure a cauliflower will work.

My measurements are still a bit vague but roughly speaking you need something like the following. Choose 1 combo plus the pysllium, almonds and salt

6 small beetroots, 2 carrots

7-8 carrots

1 head broccoli, 4 carrots

3 beetroots, 4 carrots, 1 courgette

half tsp salt,

2 tbs pysllium husks

2tbs ground almonds.

Wash or peel your vegetable selection and chop into small pieces. Put these into a food processor and whizz until finely ground.

IMG_5415

Add 2 heaped tbs psyllium husks, 2 heaped tbs ground almonds and half a teaspoon of salt. Buzz everything together then tip onto a large parchment lined tray – or trays – my tray is big 42cmx30cm.

Use your hands to spread the vegetable out evenly. Press down firmly and tidy up the edges.

IMG_5421

Bake at 190c for 10-15 minutes. The vegetable sheet should firm up. It needs to be firm enough to flip over on the tray.

Carefully, or should I say quickly and carefully, flip the wrap over and gently peel the parchment paper off. Put the wrap back into the oven and bake for another 5 minutes.

Cut the warps into appropriate sized pieces – depending whether you want to make sandwich or a wrap.

IMG_5422

We ate them with cannellini bean and almond hummus, avocado and salad. Absolutely yum!

IMG_5425


Quinoa, Butternut and Cauliflower Pilaf with Almond Sauce

I’ve been reading about alkaline diets recently , and even though we think we eat quite healthily, mostly gluten-free and vegetarian, there always seems to be an extra step – another reason to improve our diets. I invited some alkaline friends to dinner and played around with  a pilaf using quinoa instead of rice or bulgur. I wanted  to make something that was as delicious as the  original recipe but using alkaline ingredients.

I was worried the quinoa would be pappy and wet so I fried it with onions and celery and then cooked it for only 10 minutes and left it to relax. It was served it with roasted cauliflower and butternut with almond sauce drizzled over. The pilaf was perfect, a very slight nuttiness to the quiona and the roasted almonds gave a bonus crunch.

The almond butter sauce was alkaline riff on tahini sauce.  Tahini doesn’t seem to be on the alkaline list but the almond butter was delicious and worked just as well.

Quinoa, Butternut and Cauliflower Pilaf with Almond Sauce


1 medium cauliflower

1 lemon

olive oil to drizzle

125g blanched almonds

1tsp cumin seeds

salt


about 500g butternut squash or pumpkin

half a cinnamon stick

olive oil to drizzle

salt


2 onions

2 stems celery

olive oil to cover bottom of pan

a pinch of saffron, soaked in warm water

300g quinoa

half tsp ground allspice

450mls water or veg stock including the saffron infused water

a handful chopped coriander


2 cloves garlic

juice 1 lemon

1 heaped tbs almond butter

salt

water to thin


Heat the oven 200c


Put the saffron into a small jug or glass and cover with hot water. Leave aside to infuse


Cut the butternut into 1cm slices, peel and cut each piece into 2 or 3.

Put into a large bowl, drizzle with oil oil, season with a little salt and toss well. Break the cinnamon stick into 2, lengthwise then toss with the pumpkin. Tip into a roasting tray and put in the oven.. Shake very 15 minutes until cooked, roughly 3 times

IMG_5399

Wash the cauliflower, shake dry and break into florets. The bigger florets will need dividing. Put them into a large bowl and drizzle with olive oil, Zest the lemon, finely, over the cauliflower. Season with a salt and toss everything well together. Drizzle over a little more olive oil if needed. Tip the cauliflower into a roasting tray and spread out evenly. Put the almonds into the bowl and toss them in the residue of the oil then scatter on top of the cauliflower. Put into the oven and roast for 30 mins. Shake after 15.

IMG_5393

Peel and chop the onions. Heat a large skillet with a lid or a saucepan. Add a little olive oil and the onions. Cook on medium heat.

Cut the celery into 3 or 4 lengthwise then dice into half cm pieces. Add to the onion. Season with a little salt. Increase the heat so it’s all sizzling and then cook for five minutes without letting them brown.

Stir in the quinoa and the ground allspice and cook for couple of minutes, stirring all the time. Add 450mls liquid. This needs to be the saffron infused water plus water or vegetable stock to bring it up to the 450ml mark. Bring to the boil, add a little salt if you used only water, cover with a lid and turn the lowest simmer for 10 minutes. Take off of the heat but do not open the lid. Very important, no peeking as the quinoa needs to relax and absorb the steam.

Leave fro 5-10 minutes. When the veg are cooked, stir in the cauliflower and arrange the butternut on top.

Sprinkle a little chopped coriander over the top.

IMG_5402


To make the Almond Sauce

Put the juice of one lemon, 2 finely chopped cloves of garlic and a big spoonful of almond butter into a bowl with a pich of salt and mix well. It will thickens as it mixes so have some cold water handy to thin it out. Thin with a little water at a time until you have a thick cream pouring consistency.

Serve alongside the pilaf to drizzle over.

Yum!


Spring Stinging Nettle Frittata

IMG_1186

Spring is here and the nettles are back!

Like most edibles that grow we are most enthusiastic when they first arrive. One minute we’re scrabbling around searching for the baby plants, the next there is a veritable jungle standing three feet high.

They are a bonus in the kitchen but a curse for gardeners. In my case it’s a perk to be able to use something so pesky.

Young nettles are tasty and tender. The part of the plant that needs to be picked is the tip – a bit like picking tea. If you are careful they won’t sting you but if you’re in a hurry or in doubt wear a pair of gloves. Either way use a pair of scissors to snip the tips from the plants.

Nettles are a specialty of the Northern hemisphere, they don’t grow in Australia nor anywhere that isn’t fertile and wet which rules out quite a lot of the world. Their prolific growth in Ireland proves they are very happy in this climate. If you have a nettle patch that bugs you or is getting out of control just keep cutting it back and it’ll eventually get exhausted and give up.

Before you do that, and whilst they are young and tender you might enjoy this months recipe. Each year we seem to have some kind of nettle culinary craze. We’ve made pestos, herby Greek pies, smoothies and soups and this year we’re on nettle and herb frittata with local buffalo ricotta cheese. I put in fennel weed, parsley and chives, which are growing in our garden. Use whatever herbs you can get your hands on, soft green ones are best – parsley, chervil, basil, mint or chives…… Wild garlic would be good too if you could make it down to the woods.

IMG_1196

Nettle, Herb and Ricotta Frittata

1 onion

25mls olive oil

6 eggs

1litre of young nettle tips

a big handful of any herbs – fennel, parsley, basil, chives etc

150g buffalo ricotta

salt and pepper

Peel and chop the onion. Heat a small non-stick pan and add enough olive oil to barely cover the bottom and then add the chopped onion. Turn the heat to medium and gently cook the onion until it softens. Season with a little salt. Stir in the nettles, keep the heat on medium and cook gently until the nettles wilt and soften.

Chop any green herbs that you are using.

Crack the eggs into a bowl, season with a little salt and pepper whisk them to mix then stir in the chopped herbs and wilted nettles. Break the ricotta into clumps and gently stir in, don’t over mix, you need a little lumpiness.

Put the pan back on the heat and add a drizzle of olive oil. When the pan is hot pour in the nettle and egg mix then turn the heat to low and cover with a lid. Cook gently for three to four minutes. The frittata should be setting. Put the grill on hot and pop the frittata under to finish. Don’t leave it to go too golden, just a little. It’s better a little soft than overdone as it’ll continue cooking off the heat the heat.

IMG_5337


Potato Pizza

IMG_4740

I have been thinking about this making recipe for a long time – a cauliflower based pizza with potato on top. It’s kind of opposite from a normal pizza, no dough, no tomato sauce but this doesn’t make it in any way inferior, in fact it’s probably nutritionally superior and it’s quicker to make. Total comfort food. It definitely got the thumbs up as it was eaten in a flash.

Here’s the recipe

1 small cauliflower

2 eggs

3 tbs polenta

1 tsp dried oregano

1 level tsp salt

4-5 potatoes

100ml olive oil

100g cheese – I used cheddar

3 cloves garlic

a few sprigs thyme

Pre-heat the oven 200c

Rinse the cauliflower and break into florets. Blitz in a food processor until the consistency of breadcrumbs.

Tip the cauliflower into a bowl and mix in the eggs. Stir in the salt, oregano and polenta. Line a large baking tray with parchment paper and tip the mix onto the tray. Press down and smooth out with your hands to form a rectangle about 1cm thick- you could make it round if you prefer . Tidy up the sides and bake for 15 minutes or until the base becomes firm and lightly golden around the edge.

IMG_4737

Peel the potatoes and garlic and slice very thinly. Put them into a bowl and drizzle over enough olive oil to coat them. Add some salt and crumble in the thyme. Toss well together. Finely grate the cheese and toss again.

Arrange the potatoes in a thin layer, overlapping on top.

IMG_4741

Bake for 20 minutes or until the potatoes are tender and slightly crispy at the edge

IMG_4743


Sardinian Minestrone

IMG_4514

On a recent trip to Sardinia we visited an agriturismo in the hills above Tempio Pausania. Admittedly we didn’t get to see much of the countryside due to the insane rain – it dumped thirteen centimetres in one day, which was quite spectacular. As we had gone on a ‘sunsnack’ we’d left our wellies behind so there was nothing to do but eat. The family that ran the farm made dinner for the guests. There was no menu, just a series of dishes delivered to the table, all washed down with a jug of the local wine. I enjoy these surprise menus – I love being fed!

Our dinner began with a brushetta of artichokes, grilled courgettes and smoked ricotta, followed with delicious minestrone, then grilled pecorino or the farm’s own beef with tomatoes and rocket. The dessert was a tiramisu made with fresh creamy ricotta chased with a shot of the local myrtille liqueur. I have no photos!  we were so busy eating we didn’t notice until the plates were nearly empty

The minestrone famous in Sardinia, is also known as longevity soup as it’s a staple in the small villages where the people grow their own veggies and often live to become one hundred. I checked it out when I got home and Sardinia is one of the five places in the world where people live so long – this is along with Ikana in Greece, Nocaya Peninsular in Costa Rica, Okinawa in Japan and Loma Linda in California where the Seventh day Adventists live.

One thing that all these places have in common is that they principally eat very little meat but plenty of locally grown vegetables.

IMG_4572

This minestrone, which is particular to Sardinia, is made with whatever is in the garden – onions, celery, carrots, fennel etc. and beans. They could be fava beans, cannelini, borlotti or chickpeas. The version we ate had chickpeas and borlotti beans and also what looked like rice but was in fact orzo or riso pasta. It was served with grated Pecorino, the local sheep cheese, on the side but Parmesan would do the job too if you haven’t Pecorino.

IMG_4587

It’s the kind of soup that you could live on – nourishing, tasty and cheap, and who knows maybe become one hundred!


Sardinian Minestrone

1 large onion

3-4 tbs extra virgin olive oil

1 small bulb fennel

2-3 stems celery

2-3 carrots

1 large potato

6-7 cabbage leaves

2 ripe tomatoes

300g cooked chickpeas or 1 can, rinsed

300g cooked borlotti beans, or 1 can rinsed

1200 mls vegetable stock

100g orzo, riso or for g/f use rice

a handful chopped parsley

a handful chopped basil

grated Pecorino or Parmesan to serve


Peel and chop the onion. Heat a largish saucepan and add enough olive oil to cover the bottom. Stir in the onions and cook on a medium heat.

Trim the fennel and the celery and chop into small pieces. Add to the onions and stir.

Peel the carrot and dice into roughly 1cm pieces.

Peel the potato and chop into slightly bigger pieces.

Stir into the onion mix. Season with a little salt and keep cooking but don’t let the veggies brown.

IMG_4578

Wash the cabbage leaves and remove any large stem. Stack the leaves on top of each other then roll up into a big cigar and chop into ribbons. Stir into the pot

Peel and chop the garlic then stir into the pot.

Roughly chop the tomatoes into small pieces then add to the pot.

Keep cooking on a gentle heat until the tomatoes break down then stir in the borlotti beans, chickpeas and vegetable stock.

Bring the soup to the boil then simmer for 30 minutes.

Season with salt and pepper and add the orzo/riso or rice. Cook for a further 12-15 minutes. Check the seasoning and allow the soup to stand for ten minutes before serving.


Serve with grated Pecorino or Parmesan cheese on the side.

IMG_4582


borlotti and tomatoes

I had this notion to make a tomato and mascarpone risotto. We had one last year amidst our bounty of delicious tomatoes and it’s an enjoyable memory. Memory didn’t help much though when it came to finding the recipe. I searched in my books then resorted to google – tomato, risotto, mascarpone – google came up with all sorts but not the recipe I remembered, then I thought River Cafe, tomato, risotto etc and hey presto there it was – Rosemary Risotto. Funny that. My predominate memory was tomato.

IMG_4267

I thought it would be delicious to eat this risotto with borlotti beans heaped on top.

We’ve an interesting harvest of beans in the garden, I’m particularly fond of the cannelini and borlotti beans which we grow in our tunnel. They are such a treat, the lovely velvet texture of these fresh beans are definitely a notch above dried beans in consistency and flavour.

IMG_4244
I have discovered a new way to cook them this year. First I heat a few tablespoons of olive oil, then gently cook a couple of cloves of chopped garlic and then add the beans. Give them a good bathe in the olive oil then add stock and cook for about twenty minutes.As soon as they are tender drain the beans, reserve the liquid to use as stock, and tip the beans back into the pot. Dress with a little olive oil, salt and black pepper.

IMG_4212
It’s my tastiest method yet. The beans can be used in anything- soups, salads, under grilled prawns,the possibilities are endless.
They were delicious on the tomato risotto with a drizzle of extra reserve balsamic snaking over the top.

IMG_4274


Cinnamon Noodles

This is a very surprising recipe that I learnt in Bangkok with May Kaidee. Cinnamon with noodles didn’t sound attractive to me so I was very impressed with the result
It’s just the business for a cold day and a very warming and a fast lunch

It’s a very simple recipe and it’s also quite flexible – I’ve already changed it as I didn’t have all the original ingredients – and it still tastes just as good.
Here’s my ‘Irished’ home version. The original recipe used mushroom sauce and soya bean sauce – this keeps it vegetarian – but I didn’t have either in the house so I used a mix of sweet soya, tamari and a little bit of shrimp paste to give it some body.

This is my take on the dish but feel free to play around!

1tbs coriander seeds bashed up in the mortar and pestle
3 fatty cloves garlic
1 hot red chilli
1 stem lemongrass
all roughly chopped then added to the mortar and pestle and ground to a paste.

IMG_3315

1 tsp ground black pepper
1 heaped tsp ground cinnamon
stirred into the paste

1 carrot, sliced thinly.
a little chopped cabbage
a handful of chopped mushrooms
the centre of a head of celery – the fronds bit, chopped
a handful of chopped spring onions
700mls vegetable stock

IMG_3317

1tbs sweet soya sauce
1tbs tamari sauce
1 tsp shrimp paste

a handful of rice stick noodles soaked in tepid water for five minutes

Heat a table spoon on oil in the wok then stir in the spice mix and cook on medium heat for a few minutes.
Stir in the vegetable stock, add the carrots, mushroom and tofu and bring to the boil.
Cook for 3-4 minutes then stir sweet soya sauce, tamari and shrimp paste. Next add the cabbage followed by the noodles. Cook for a couple of minutes more, take off the heat and stir in the chopped celery and spring onions.

Ladle into bowls and serve with crushed roasted peanuts and wedges of lime on the side.

IMG_3322